Docs
Cloud Storage
Cloud Storage
How to config the cloud storage api
English
简体中文Overview
Administrators can manage s3 configurations at /admin/system,
including adding, deleting, and modifying s3 configurations for cloud storage.
WR.DO now supports multiple cloud storage providers:
- Cloudflare R2
- AWS S3
- Tencent COS
- Ali OSS
- Custom Provider (Support any S3 compatible provider)
One provider can configure multiple buckets.
Cloudflare R2
1. Create R2 Bucket
- Log in to your Cloudflare dashboard
- Navigate to R2 Object Storage from the left sidebar
- Click Create bucket
- Enter your bucket name (e.g.,
wrdo) - Select the location (auto is recommended)
- Click Create bucket
2. Get API Credentials
- In your Cloudflare dashboard, go to My Profile > API Tokens
- Click Create Token
- Use the R2 Token template or create a custom token with:
- Permissions:
R2:Edit - Account Resources: Include your account
- Zone Resources: Include all zones (if needed)
- Permissions:
- Click Continue to summary and then Create Token
- Copy and save the token (this is your Access Key ID and Secret Access Key)
3. Get Account ID
- In your Cloudflare dashboard, go to the right sidebar
- Copy your Account ID
4. Get Public URL
- In your Cloudflare dashboard, go to R2 Object Storage > Bucket Details > Public Development URL
if you have configured a custom domain, use that instead.
5. Config CORS
- In your Cloudflare dashboard, go to R2 Object Storage > Bucket Settings -> CORS Policy
Fill in the following:
[
  {
    "AllowedOrigins": [
      "http://localhost:3000",
      "https://wr.do" // Replace with your domain
    ],
    "AllowedMethods": [
      "GET",
      "PUT",
      "POST",
      "DELETE",
      "HEAD"
    ],
    "AllowedHeaders": [
      "*"
    ],
    "ExposeHeaders": [
      "ETag"
    ],
    "MaxAgeSeconds": 3600
  }
]6. Configuration in WR.DO
Follow localhost:3000/admin/system, fill in the configuration form with:
- Provider: cloudflare (r2)
- Channel Name: Cloudflare R2 (or any custom name)
- S3 Endpoint:
https://<account_id>.r2.cloudflarestorage.com(replace with your account's endpoint) - Access Key ID: Your API token from step 2
- Secret Access Key: Your API token from step 2
- Enable: Toggle ON
- Bucket Name: Your bucket name
- Public Domain: follow step 4
- Storage Region: auto
- Prefix: Optional
- Public: Enable if you want public access
Tencent COS
1. Create COS Bucket
- Log in to Tencent Cloud Console
- Click Bucket List > Create Bucket
- Enter bucket name (e.g.,
wrdo-1303456836) - Select region (e.g.,
ap-chengdu) - Configure access permissions
- Click Create
2. Get API Keys
- Go to CAM Console
- Click Create Key or use existing keys
- Save your SecretId and SecretKey
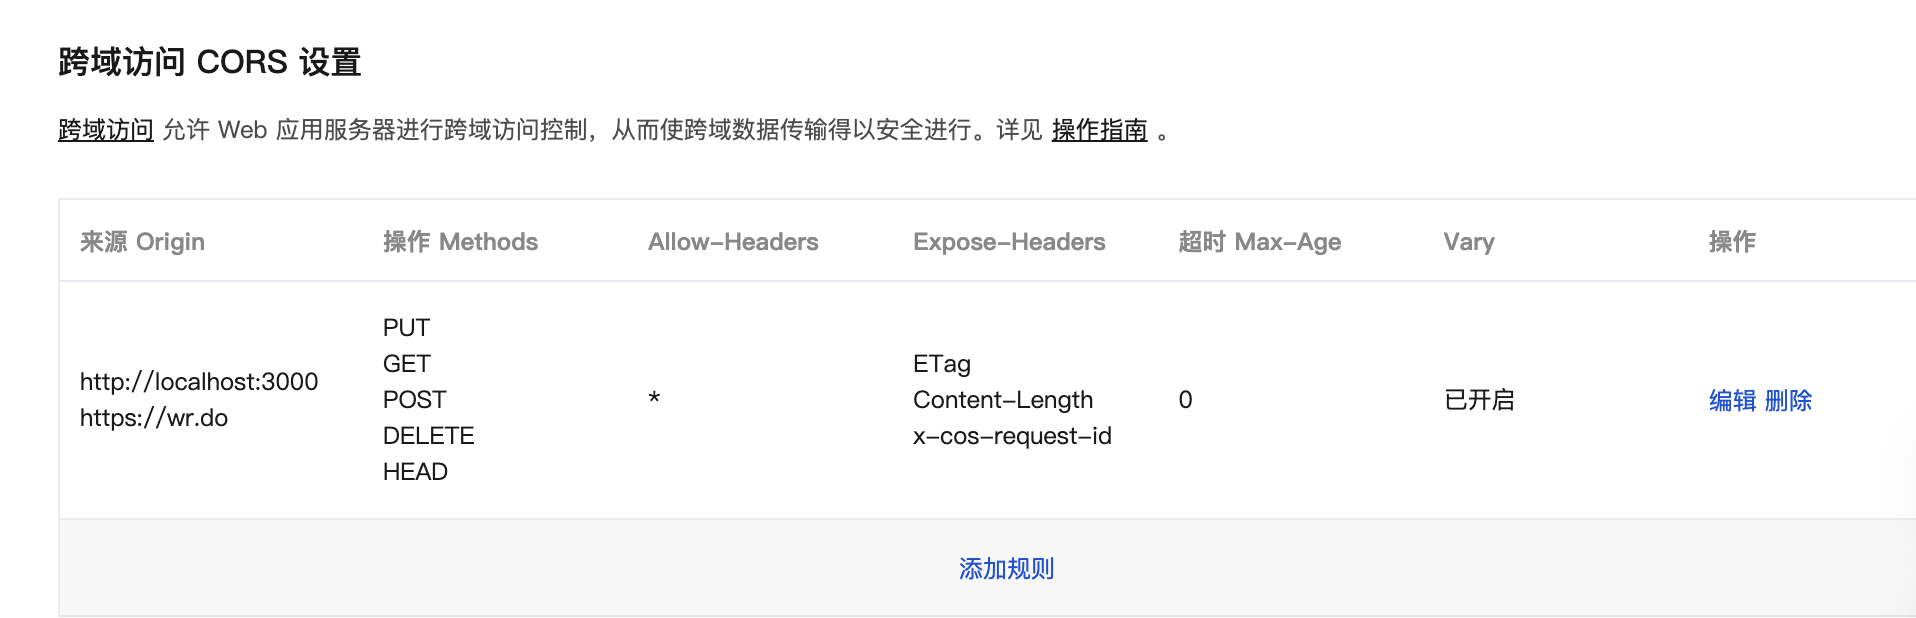
3. CORS 设置
- Follow COS Console
- Click Bucket List > Select a Bucket -> 安全管理 -> 跨域访问 CORS 设置
- Fill in the following rules:
4. Configuration in WR.DO
Fill in the configuration form with:
- Provider: tencent (cos)
- Channel Name: 腾讯云 COS (or any custom name)
- S3 Endpoint:
https://cos.ap-chengdu.myqcloud.com(replace with your region) - Access Key ID: Your SecretId
- Secret Access Key: Your SecretKey
- Enable: Toggle ON
- Bucket Name: Your bucket name (e.g.,
wrdo-1303456836) - Public Domain:
https://wrdo-1303456836.cos.ap-chengdu.myqcloud.com(your bucket's public URL) - Storage Region: Your COS region (e.g.,
ap-chengdu) - Prefix: Optional date prefix
- Public: Enable if you want public access
Ali OSS
1. Create OSS Bucket
- Log in to Alibaba Cloud Console
- Click Create Bucket
- Enter bucket name
- Select region (e.g.,
oss-cn-hangzhou) - Configure ACL and other settings
- Click OK
2. Get AccessKey
- Go to RAM Console
- Click Create AccessKey or use existing keys
- Save your AccessKeyId and AccessKeySecret
3. Configuration in WR.DO
Fill in the configuration form with:
- Provider: ali (oss)
- Channel Name: 阿里云 OSS (or any custom name)
- S3 Endpoint:
https://oss-cn-hangzhou.aliyuncs.com(replace with your region) - Access Key ID: Your AccessKeyId
- Secret Access Key: Your AccessKeySecret
- Enable: Toggle ON
- Bucket Name: Your bucket name
- Public Domain:
https://your-bucket.oss-cn-hangzhou.aliyuncs.com(your bucket's public URL) - Storage Region: Your OSS region (e.g.,
oss-cn-hangzhou) - Prefix: Optional date prefix
- Public: Enable if you want public access
AWS S3
1. Create S3 Bucket
- Log in to AWS Console
- Click Create bucket
- Enter bucket name (globally unique)
- Select AWS region
- Configure bucket settings as needed
- Click Create bucket
2. Create IAM User
- Go to IAM Console
- Click Users > Add user
- Enter username and select Programmatic access
- Attach existing policies or create custom policy with S3 permissions:
{ "Version": "2012-10-17", "Statement": [ { "Effect": "Allow", "Action": [ "s3:GetObject", "s3:PutObject", "s3:DeleteObject", "s3:ListBucket" ], "Resource": [ "arn:aws:s3:::your-bucket-name", "arn:aws:s3:::your-bucket-name/*" ] } ] } - Complete user creation and save Access Key ID and Secret Access Key
3. Configuration in WR.DO
Fill in the configuration form with:
- Provider: aws (s3)
- Channel Name: AWS S3 (or any custom name)
- S3 Endpoint:
https://s3.amazonaws.com(or region-specific endpoint) - Access Key ID: Your IAM user's Access Key ID
- Secret Access Key: Your IAM user's Secret Access Key
- Enable: Toggle ON
- Bucket Name: Your S3 bucket name
- Public Domain: Your bucket's public URL or CloudFront distribution
- Storage Region: Your S3 region (e.g.,
us-east-1) - Prefix: Optional date prefix
- Public: Enable if you want public access
Common Configuration Options
Prefix Settings
- Use date-based prefixes (e.g.,
2025/08/08) to organize files by date - Leave empty if you prefer flat file structure
Public Access
- Enable Public if you want files to be accessible via direct URLs
- Disable for private file storage
Custom Domains
- Configure custom domains for better branding
- Ensure proper DNS configuration for your domain
Troubleshooting
Common Issues
- Access Denied: Check your API credentials and permissions
- Bucket Not Found: Verify bucket name and region settings
- CORS Issues: Configure CORS settings in your bucket if needed
- Endpoint Errors: Ensure correct endpoint format for your provider
Testing Configuration
After saving your configuration, you can test it by:
- Uploading a test file through the admin interface
- Checking if the file appears in your cloud storage bucket
- Verifying public access (if enabled) by accessing the file URL